Understanding HTML Tags and Elements
HTML is like the skeleton of a website. Without it, there's no structure, no foundation—just emptiness. When I first started learning web development, I thought HTML was boring compared to flashy animations or cool designs. But then I realized: you can't build anything without it. CSS makes things pretty, JavaScript makes them interactive, but HTML? HTML makes them exist.
In this blog, I'll share everything I've learned about HTML tags and elements as a beginner. We'll go through what they are, how they work, and why they matter if you want to build websites.
What HTML is and why we use it
HTML stands for HyperText Markup Language. I know, it sounds complicated, but it's actually pretty simple once you break it down.
Think of HTML as the skeleton of a webpage. Just like our bones give our body structure, HTML gives structure to websites. It tells the browser, "Hey, this is a heading, this is a paragraph, this is an image, this is a link." Without HTML, the browser would have no idea how to display anything.
We use HTML because it:
Gives structure to content: It organizes text, images, videos, and links in a way that makes sense.
Helps browsers understand your page: The browser reads HTML tags and knows exactly how to display each piece of content.
Forms the base of every website: No matter how fancy a website looks, it all starts with HTML. Then we add CSS for styling and JavaScript for interactivity.
Simply put, HTML is where everything begins. You can't skip it if you want to build for the web.
What an HTML tag is
An HTML tag is basically an instruction for the browser. It's like telling the browser, "Start doing this" or "Stop doing that."
Tags are written inside angle brackets like this: <tagname>
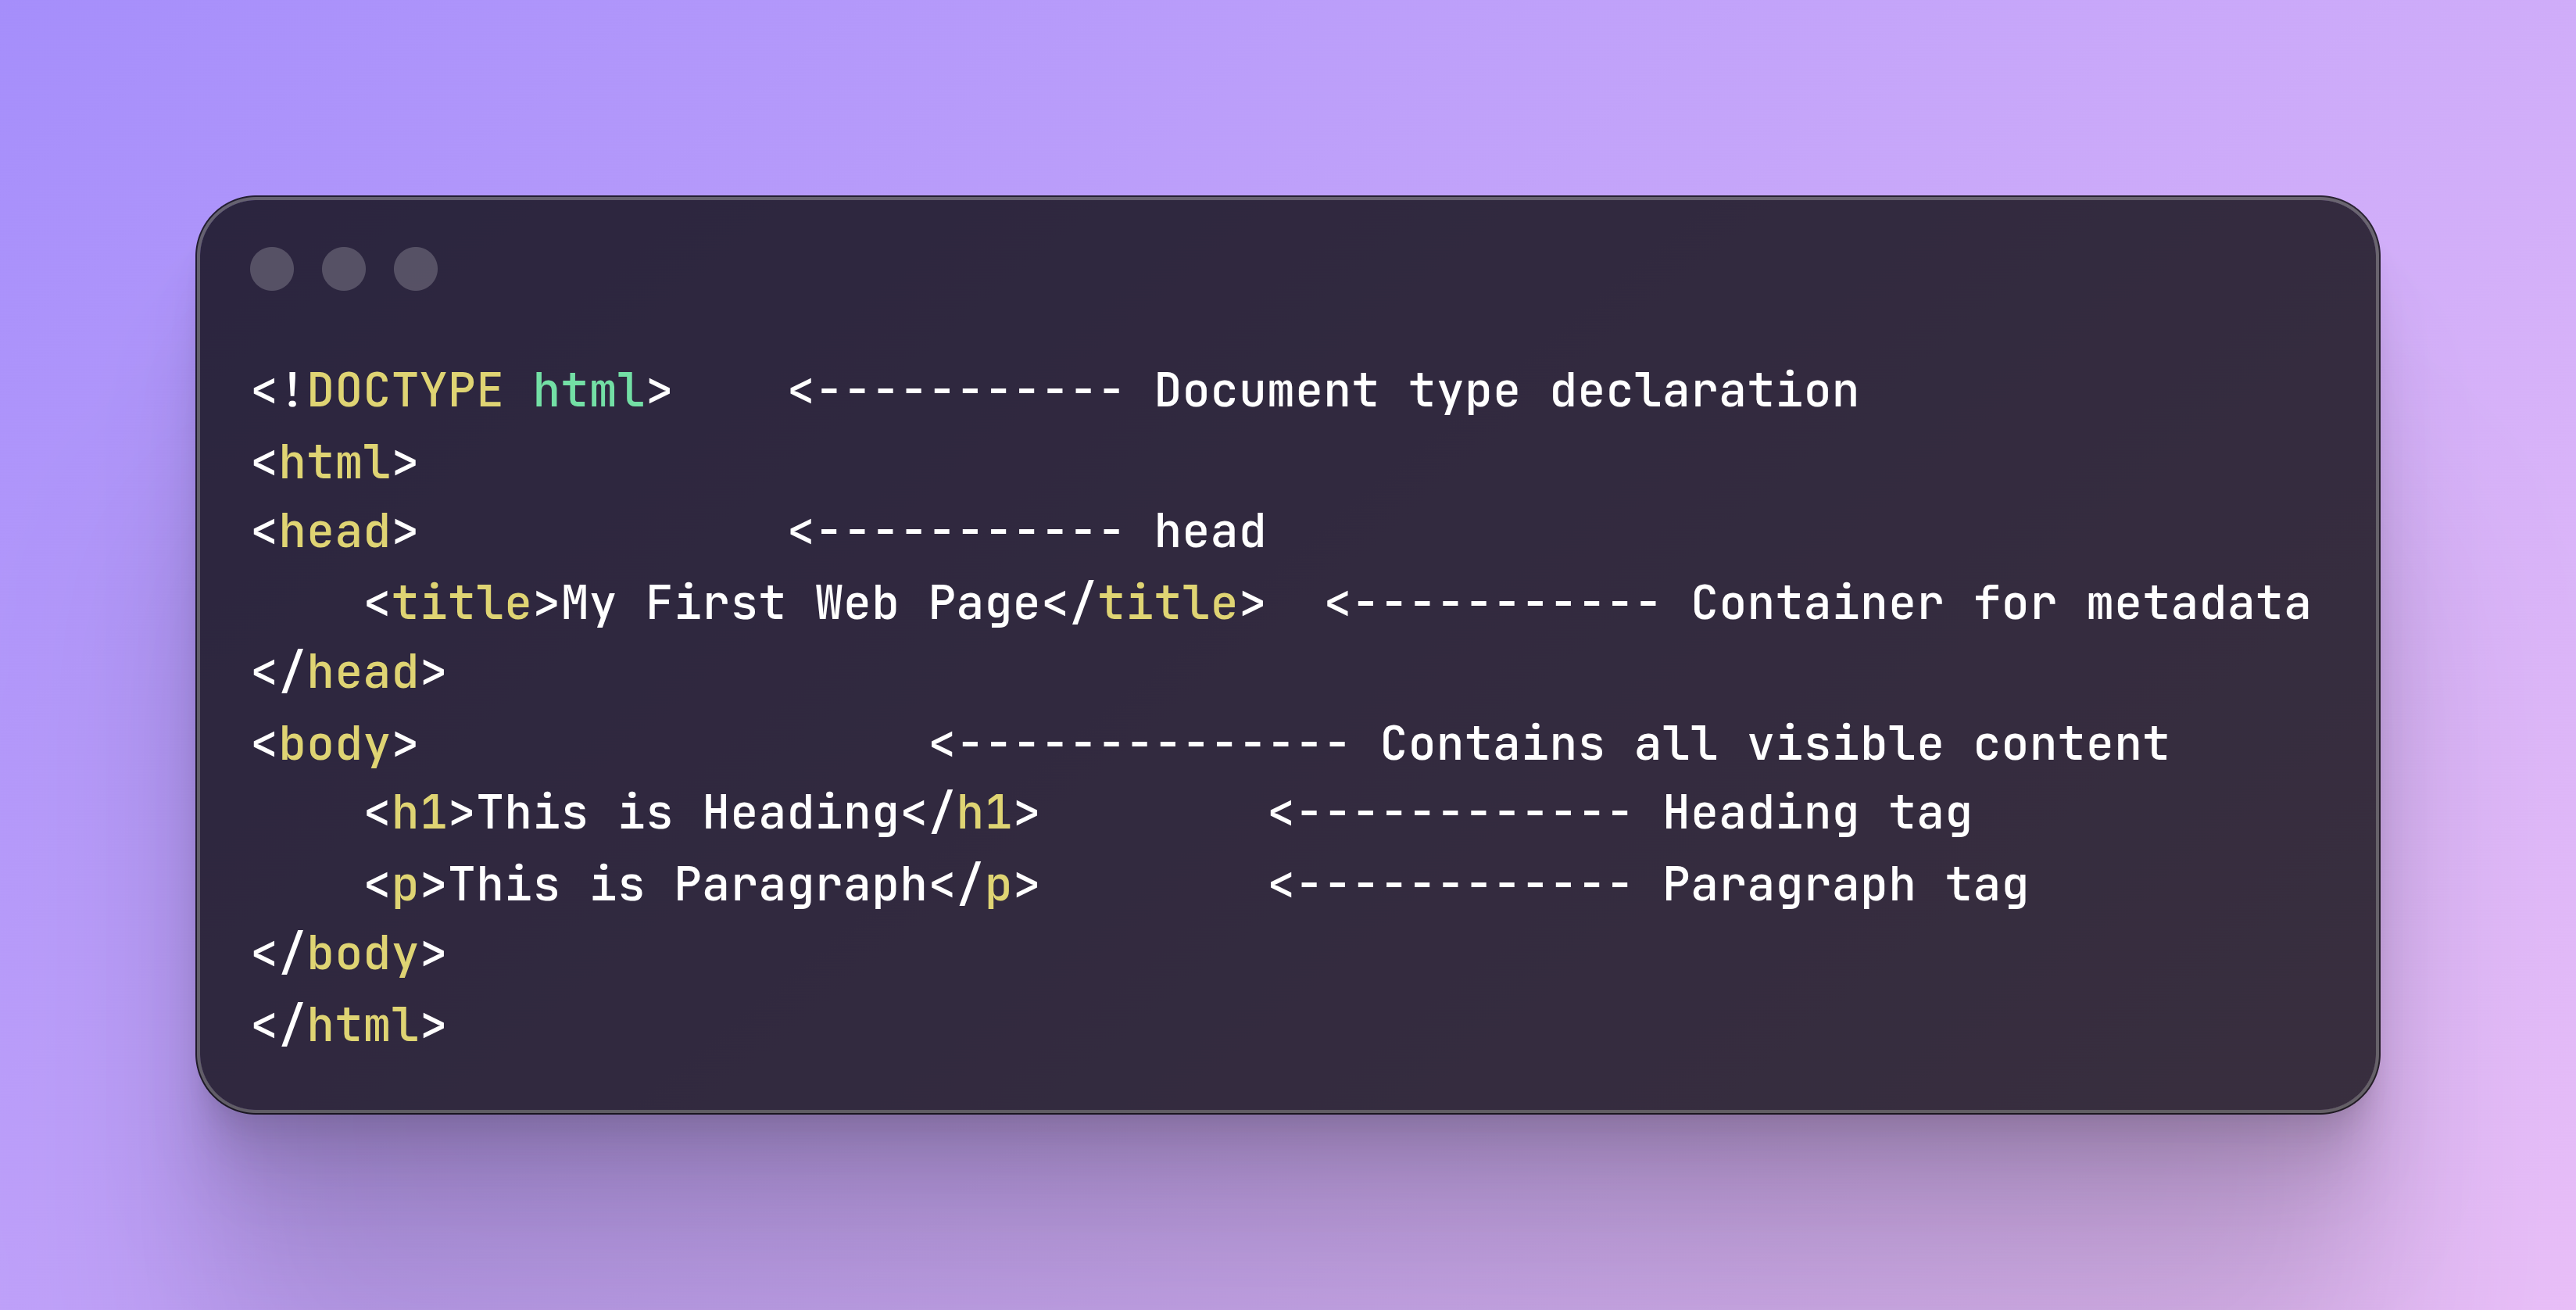
For example:
<p>tells the browser to start a paragraph</p>tells it to end the paragraph
Most tags come in pairs:
Opening tag:
<p>— starts the instructionClosing tag:
</p>— ends the instruction
Everything you put between these tags is what the browser will display or process.
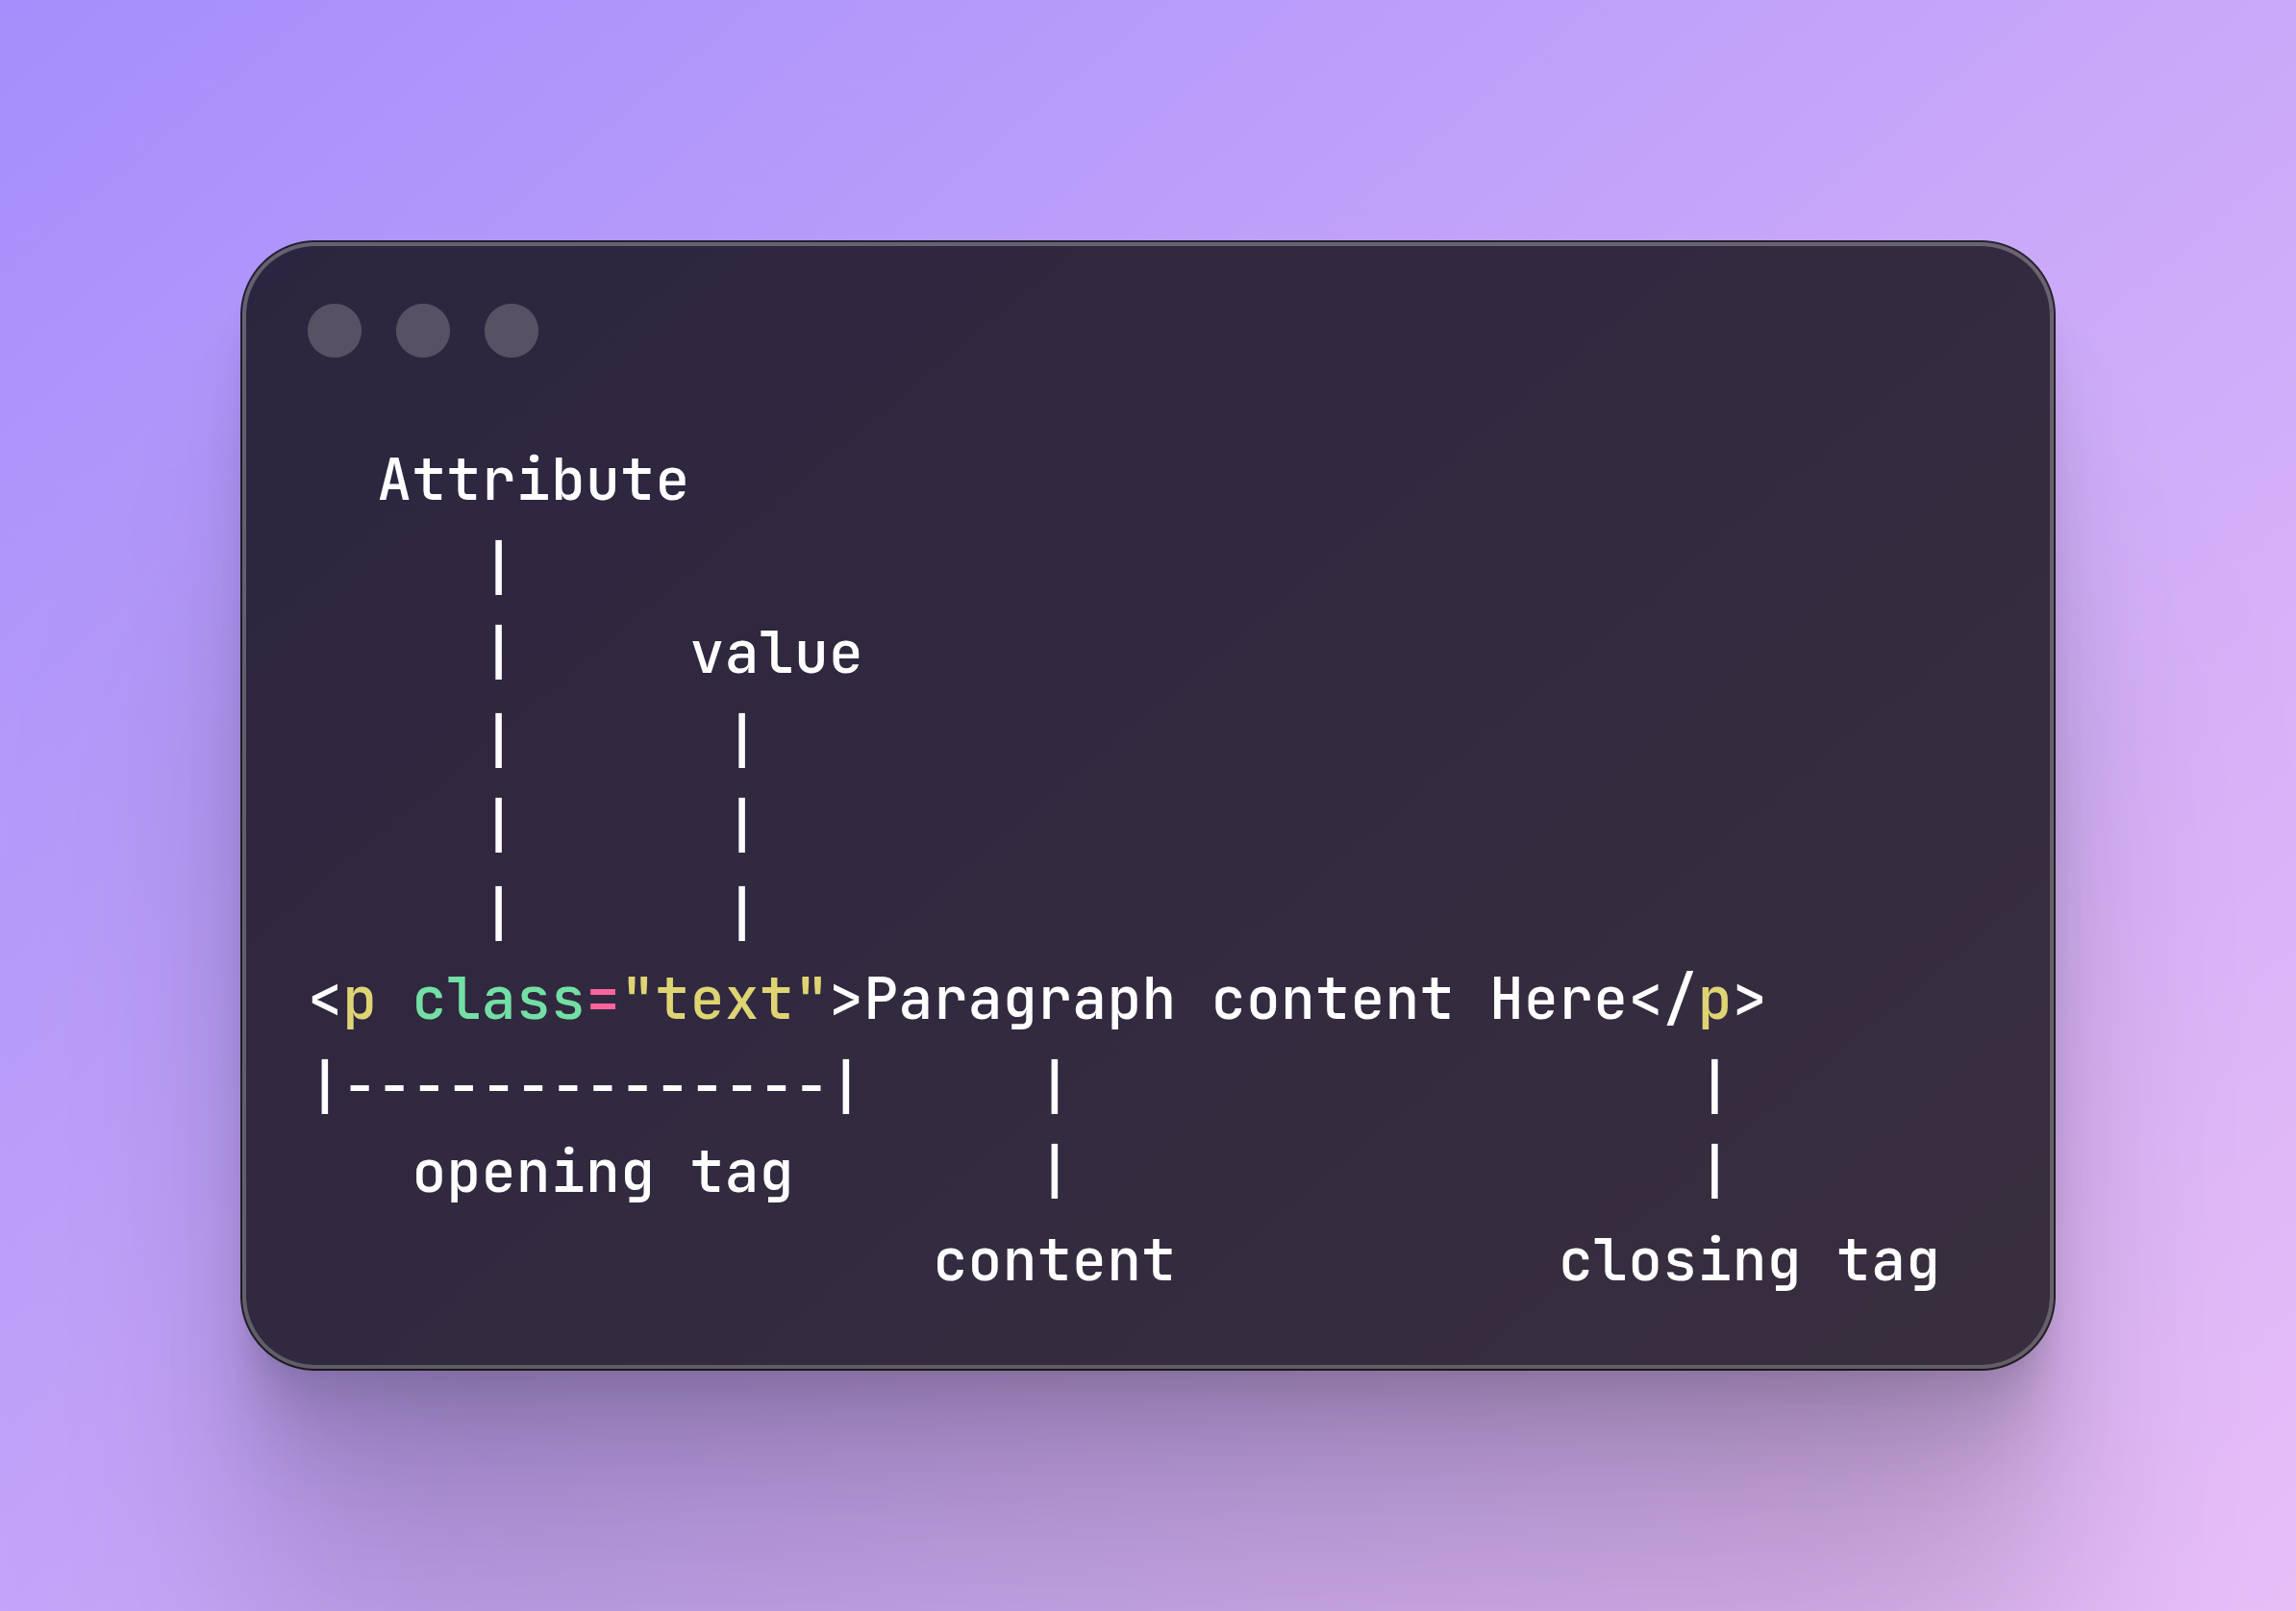
Opening tag, closing tag, and content
Let me explain this with a simple example:
<p>This is my first paragraph.</p>
Here's what's happening:
<p> — This is the opening tag. It tells the browser, "A paragraph is starting here."
This is my first paragraph. — This is the content. It's what will actually show up on the webpage.
</p> — This is the closing tag. It tells the browser, "Okay, the paragraph is done now."
Together, all three parts work like a sandwich:
The opening tag is the top slice of bread
The content is the filling
The closing tag is the bottom slice
Without the closing tag, the browser might get confused about where the paragraph end
s, and your page might look broken.
"Think of HTML tags like a conversation:
The opening tag says 'start here,'
the closing tag says 'stop here,'
and the content is what you're actually saying."
What an HTML element means
An HTML element is the whole package: the opening tag, the content, and the closing tag—all together.
For example:
<h1>Welcome to My Blog</h1>
This entire thing is called an HTML element. It includes:
Opening tag:
<h1>Content: Welcome to My Blog
Closing tag:
</h1>
So when someone says "HTML element," they're talking about the complete structure, not just the tag itself.
Here's another example:
<div>
  <p>This is a paragraph inside a div.</p>
</div>
The <div> element contains a <p> element. Elements can be nested inside other elements, which helps us organize content in a structured way.
The difference between a tag and an element:
If the tag is like a label on a box, then the element is the entire box with everything inside it.
Self-closing (void) elements
Now, here's where things get a little different. Not all HTML elements need a closing tag. Some tags are complete on their own—they don't have content inside them.
These are called self-closing elements or void elements.
For example:
<img src="photo.jpg" alt="A beautiful sunset">
The <img> tag doesn't need a closing tag because it doesn't wrap around any content. It just displays an image, and that's it. The image itself is defined by the src attribute.
Other common self-closing elements include:
<br>— line break (starts a new line)<hr>— horizontal line<input>— form input field<meta>— metadata about the page<link>— links external resources like stylesheets
When I first started, I kept trying to close these tags with </img> or </br>, and it confused me why the code still worked. Now I know—they don't need closing tags!
Block-level vs inline elements
Okay, this one took me a while to understand, but it's actually really important.
HTML elements are divided into two main types: block-level elements and inline elements. They behave differently on the page.
Block-level elements
Block-level elements take up the full width of their container, and they always start on a new line.
Think of them like big containers that stack on top of each other vertically.
Examples:
<div><p><h1>to<h6><ul>and<ol><section>
Code example:
<div>This is a block element.</div>
<p>This is another block element.</p>
Output:
Each element starts on a new line and takes up the full width, stacking one below the other.
Inline elements
Inline elements only take up as much width as their content needs, and they don't start on a new line. They flow along with the text.
Think of them like words in a sentence—they stay in line with everything else.
Examples:
<span><a><strong><em><img>
Code example:
<p>This is <strong>bold text</strong> inside a paragraph.</p>
Output:
The <strong> tag stays on the same line as the rest of the text. It doesn't break into a new line.
Quick summary:
Block = big container → takes full width → starts on new line
Inline = small content → takes only needed width → stays on same line
"At first, I thought inline elements were better because you could fit more stuff on one line. But then I realized block elements are just as important. They help divide your page into clear sections, making it easier to read and organize. Without block elements, everything would be jumbled together, and the page would feel messy and confusing."
Commonly used HTML tags
Now that we understand the basics, let's look at some of the most common HTML tags you'll use when building webpages.
Headings (<h1> to <h6>)
<h1>Main Heading</h1>
<h2>Subheading</h2>
<h3>Smaller Heading</h3>
<h1>is the biggest and most important heading<h6>is the smallestHeadings help organize your content and make it easier to scan
Paragraph (<p>)
<p>This is a paragraph of text.</p>
Used for blocks of text. Each paragraph starts on a new line.
Links (<a>)
<a href="https://example.com">Click here</a>
hrefis an attribute that tells the browser where to go when clickedLinks let users navigate between pages
Images (<img>)
<img src="image.jpg" alt="Description of image">
srcspecifies the image filealtprovides alternative text for screen readers and when the image doesn't loadSelf-closing tag (no closing tag needed)
Lists
Unordered list (bullet points):
<ul>
  <li>First item</li>
  <li>Second item</li>
  <li>Third item</li>
</ul>
Ordered list (numbered):
<ol>
  <li>Step one</li>
  <li>Step two</li>
  <li>Step three</li>
</ol>
<ul>= unordered (bullets)<ol>= ordered (numbers)<li>= list item
Divisions (<div>)
<div>
  <h2>Section Title</h2>
  <p>Some content goes here.</p>
</div>
<div>is a generic containerUsed to group elements together
Helps organize and structure your page
Span (<span>)
<p>This is <span style="color: red;">red text</span> in a paragraph.</p>
Inline container for styling small parts of text
Doesn't break the flow of content
Line breaks (<br>)
<p>First line.<br>Second line.</p>
Creates a line break without starting a new paragraph.
Horizontal rule (<hr>)
<p>Section one.</p>
<hr>
<p>Section two.</p>
Creates a horizontal line to separate content.
Inspect HTML in the browser
One of the coolest things I discovered as a beginner is that you can see the HTML of any website. It's like looking under the hood of a car—you get to see how everything works.
How to do it:
Right-click anywhere on a webpage
Select "Inspect" or "Inspect Element"
A panel will open showing you the HTML code
You can also press Ctrl+Shift+I (Windows) or Cmd+Option+I (Mac).
This tool is amazing because:
You can see how professional websites are structured
You can temporarily edit the HTML and see changes in real-time
It helps you understand how tags and elements work together
It's a hands-on way to learn by experimenting
I spent hours just inspecting random websites, changing text, hiding elements, and playing around with the code. It made learning HTML so much more fun and practical.
Conclusion
HTML might seem simple, but it's the foundation of everything on the web. Understanding tags, elements, attributes, and how they fit together makes building websites so much easier and more enjoyable.
The best way to learn HTML isn't just by reading—it's by doing. Open up a text editor, write some HTML, save it as an .html file, and open it in your browser. Inspect websites you like, see how they're built, and experiment with the code.
At first, I made tons of mistakes. I forgot closing tags, mixed up block and inline elements, and broke my layouts constantly. But each mistake taught me something new. That's how you learn.
Once you're comfortable with HTML, learning CSS and JavaScript becomes so much smoother. So keep practicing, keep inspecting, and most importantly—keep building. The more you play around with it, the more confident you'll become.
Happy coding!